Klister is this easy to use (guide)
Klister is more than sticky fingers and clogs underneath the skis. Now we’ll show you how to get the best results from using klister.
Most skiers have used klister on their skis, but not everyone knows how to lay the perfect klister layer to ensure optimal grip and preserve glide.
What you will learn in this article:
● When to use klister on your skis.
● Differences among klisters.
● How to apply klister.
● How to remove klister.
Further reading: Sticker Masking from Swix
When should you use klister on your skis?
Although it is easy to resort to klister when the temperature gauge rises above freezing, it is actually the type of snow that decides when klister works best. When the snow is fine-grained or fresh snow has arrived, it is dry wax that counts. Then our soft grip waxes in the V and VP lines work.
If the snow is wet, transformed, coarsely grained is "old snow," then it’s klister that applies! In any case, you need to take a look at the temperature range, as there are different klisters for different temperatures.
Different types of klister
You can find our full klister assortment here.
But most often racers choose to use these types:
1. Base klister
To get the most effect from the klister, make a thin layer of base klister on the bottom. You can choose between base klister in a tube or in a spray. Our waxers often use the spray version, which is very easy to use.
2. A violet klister
The violet klister types are perfect when there are hard, almost icy tracks. Typically, the conditions you encounter during Easter weeks early in the day before the sun takes hold. Here we recommend either KX35 or KN33.
3. The World Cup klister
Our most widely used klister is definitely the classic “VM klister” also known as universal klister or K22. VM klister has become very popular due to its wide range of applications and particularly good properties in soft conditions. In fact, you can use this klister from -3 ℃ on transformed snow to plus 10 ℃.
How to apply klister
See an instructional video on how to apply klister here.
Step 1:
Start by rubbing the grip zone (as you always do) with sandpaper. P100 paper is a good idea. Rub the innermost zone marked on your skis.
Step 2:
To keep the klister in place and increase its durability: Apply a thin layer of base klister. Use KB20, a base klister spray. Complete one side of the groove on the base before starting the other. Smooth with a thumb and allow to dry for 10–15 minutes.
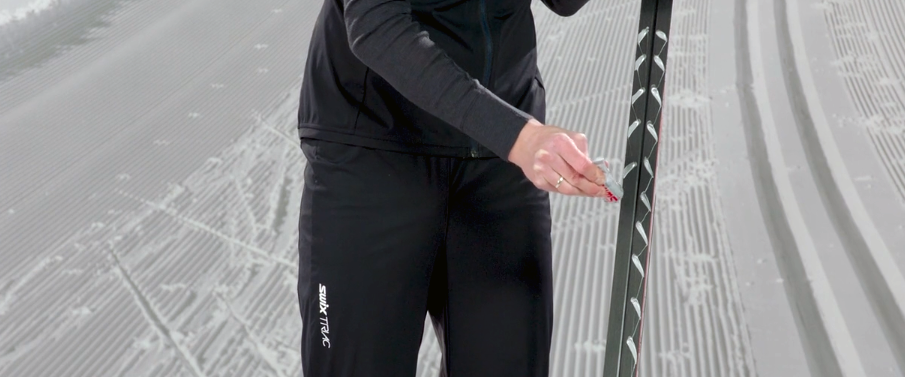
Step 3:
Add klister in a herringbone pattern. Complete one side of the groove on the base before starting the other. See the image below.
Step 4:
Even out the klister using a thumb or the included scraper. Yes, it can become sticky, but excess klister can easily be removed with the scraper included in the klister pack.
How to remove klister from your skis
Step 1:
Tear off Fiberlene (cleaning paper) the same length as the waxing zone and place it carefully on the base.
Step 2:
Moisten the cleaning paper with SWIX Base Cleaner.
Step 3:
Peel off the moist Fiberlene with a plexi scraper or the scraper provided in the klister pack.
Step 4:
Most of it comes off at step 3, but make sure you get a perfectly clean base by washing off the waxing zone with a piece of Fiberlene and Swix Base Cleaner.
NB: It’s easy to apply and remove klister in the spring sun, but it’s easier to work with klister at room temperature!
Happy skiing!